UberEnvironment: Difference between revisions
mNo edit summary |
m (→Parameters) |
||
| Line 36: | Line 36: | ||
===Parameters=== | ===Parameters=== | ||
[[Image:UberEnvironment_sg_params.jpg]] | [[Image:UberEnvironment_sg_params.jpg|left]] | ||
{| border="1" | |||
{| border="1" | ! Parameters !! Description | ||
| | |- | ||
! | ! Intensity | ||
| The intensity of the light | |||
|- | |||
! Intensity Scale | |||
| Light intensity multiplier | |||
|- | |||
! colspan=2 | Map Controls | |||
|- | |||
! Saturation | |||
| The saturation of the Color (Environment) Map. | |||
|- | |||
! Contrast | |||
| The contrast of the Color (Environment) Map. | |||
|- | |||
! colspan=2 | Raytracing | |||
|- | |||
! Ray trace | |||
| (On/Off) This turns on ray tracing, which is a slow but accurate way of calculating shading using ambient occlusion. | |||
|- | |||
! Bent Normals | |||
| Do the Environment Map lookup using the ''bent normal''. This only applies when using a mapped light color. | |||
|- | |||
! Occlusion Strength | |||
| The strength of the occlusion effect (The darkness of the shadows). | |||
|- | |||
! Occlusion Color | |||
| The color of the occlusion effect (The color of the shadows). | |||
|- | |||
! Occlusion Samples | |||
| The number of rays used in the occlusion calculation. Higher number = Higher quality = Slower renders. | |||
|- | |- | ||
! | ! colspan=2 | Advanced | ||
|- | |- | ||
! | ! Shading Rate | ||
| | | This is the shading rate used only for occlusion. Higher number = Lower quality = Faster renders | ||
|- | |- | ||
! Max Error | |||
| The 3Delight Irradiance Max Error. Higher number = Lower quality = Faster renders | |||
|- | |- | ||
| | ! Maximum Trace Distance | ||
| The maximum distance a ray will be allowed to travel and be considered in occlusion. Smaller numbers will produce finer detail occlusion. | |||
|} | |} | ||
For further information on the Advanced controls, see the [http://www.3delight.com/en/index.php/products/3delight/3delight_documentation 3Delight docs]. | |||
For further information on the Advanced controls, see the [http://www.3delight.com/en/index.php/products/3delight/3delight_documentation | |||
==Using UberEnvironment== | ==Using UberEnvironment== | ||
Revision as of 23:05, 21 January 2010
UberEnvironment light shader and textures for allowing realistic lighting control in DAZStudio.
Also see the UberEnvironmentFAQs page for frequently asked questions
Product Description
UberEnvironment is a 3Delight light shader designed for Ambient and Environmental lighting effects through the use of ambient occlusion with optional bent normals, as well as Image Based Lighting using HDRI (Environment Maps).
Features
- Ambient Occlusion
- Occlusion Samples
- Shading Rate control
- Irradiance Max Error
- Environment Mapping
- Bent Normal Support
- Saturation
- Contrast
- Included 4 HDR convolved lat/long Environment Maps
- KHPark_EnvM.tif
- Kitchen_EnvM.tif
- LightDome_EnvM.tif
- Sunset_EnvM.tif
- 5 Quality Presets for quick tuning of render time/image quality
- XLo
- Lo
- Med
- Hi
- XHi
Parameters
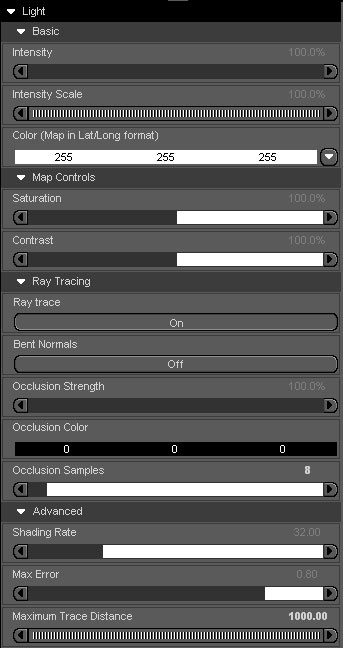
| Parameters | Description |
|---|---|
| Intensity | The intensity of the light |
| Intensity Scale | Light intensity multiplier |
| Map Controls | |
| Saturation | The saturation of the Color (Environment) Map. |
| Contrast | The contrast of the Color (Environment) Map. |
| Raytracing | |
| Ray trace | (On/Off) This turns on ray tracing, which is a slow but accurate way of calculating shading using ambient occlusion. |
| Bent Normals | Do the Environment Map lookup using the bent normal. This only applies when using a mapped light color. |
| Occlusion Strength | The strength of the occlusion effect (The darkness of the shadows). |
| Occlusion Color | The color of the occlusion effect (The color of the shadows). |
| Occlusion Samples | The number of rays used in the occlusion calculation. Higher number = Higher quality = Slower renders. |
| Advanced | |
| Shading Rate | This is the shading rate used only for occlusion. Higher number = Lower quality = Faster renders |
| Max Error | The 3Delight Irradiance Max Error. Higher number = Lower quality = Faster renders |
| Maximum Trace Distance | The maximum distance a ray will be allowed to travel and be considered in occlusion. Smaller numbers will produce finer detail occlusion. |
For further information on the Advanced controls, see the 3Delight docs.
Using UberEnvironment
Ambient Occlusion Effects
^{img src="img/myicons/alert.png"} Ambient Occlusion uses ray tracing which can lead to long render times.^
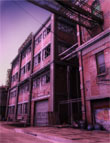
{img src="img/wiki_up/uberEnvironment_pp02_lo.jpg" imalign=left}
The UberEnvironment shader can be used to achieve ambient occlusion effects. This can be done by doing the following:
- {img src="img/wiki_up/uber_environment_base.jpg" width=45 height=45} Add an UberEnvironment light to your scene.
- By default, the light will be setup to render with Ambient Occlusion.
- Do a test render.
Image Based Lighting Effects
UberEnvironment allows you to use a image map, or Environment Map as I will refer to it. This is an image file that describes light color and intensity based on direction.
- Select one of the Environment Map presets (Sunset for example).
- Turn raytracing off. If you are going for subtle ambient lighting, you may not need to take the hit for raytracing.
- {img src="img/myicons/alert.png"} Rotating/Translating the light will not change the rendered image. Rotate the scene to get the desired placement of the Environment lighting.
- If raytracing is necessary, turn it on and use the provided quality presets to optimize your render.
The Included Environment Maps
||{img src="img/wiki_up/uberEnvironment_pp03map_med.jpg" imalign=left hspace=20}|Here are sample renders showing the 4 included environment maps. The top two (KHPark and Kitchen) Are derived from HDR photos That I took. The bottom two were painted to get a specific effect.||
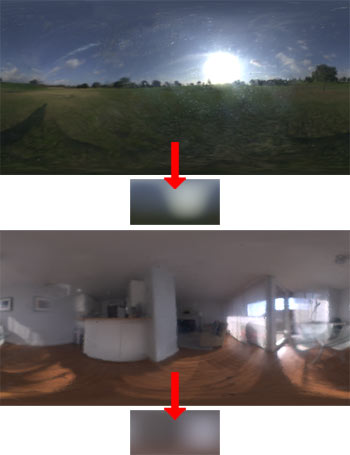
This image shows the original HDRI before they were made into Environment Maps. You will notice that the Environments are very small and blurry but this is intentional as we are simulating diffuse lighting with these maps.||
Tips and Tricks
- Raytraced effects get slower as the geometry increases in the scene. If there is geometry (props, characters) that are in your scene and not contributing to the final image, make it invisible or delete it.
- Use the quality control presets often. Always start with the lowest quality that will work to approximate the effect before bumping up the quality.
- It is often very useful to turn off all other lights in the scene until you have roughed in general light direction/intensity.
- Only ever use one UberEnvironment in a scene.
- When using Environment Maps, turn off raytracing initially. When you are satisfied with your light placement after doing some test renders, turn raytracing back on for the full effect.
Developer Notes
Creating Environment Maps
In order to correctly create custom Environment Maps with UberEnvironment, the following must happen:
- The map must be in Lat/Long (or latitude/longitude) format.
- The source image can be in any tdlmake supported format; TIFF, JPEG, OpenEXR, HDR, etc. I use HDR.
- For best results the source image should be convolved or spherically blurred in order to best simulate diffuse lighting. This can be done with a free application such as HDRShop. (Figure 3 above shows the result of this process)
- The 3Delight utility tdlmake must be run on the source image manually with the -envlatl option and output in .tif format in order to create an image that DazStudio can see, and that is optimized for 3Delight. For further information tdlmake, see the docs|nocache.
The omHdrConverter is now freely available to make this process less painful.


