ReLight
ReLight Multipass Rendering Script for DAZ|Studio
Product Description
ReLight is a DAZ|Studio script written to allow for re-lighting of a render through the use of multipass rendering in combination with 2D compositing (like Photoshop). ReLight allows for the automated creation of Diffuse, Specular passes on a scene or per-light basis, as well as Ambient color output into individual images. This allows the user to render each light as a separate image, and then add all lights together in 2D, providing interactive control of light intensities and colors. The dialing of light colors and intensities as post process eliminates the need for numerous time consuming render iterations in balancing lights. It also allows you to paint and edit in new and powerful ways.
Features
- Specular shading component output
- Diffuse shading component output
- Ambient shading component output
- Specular and Diffuse output can be created per light
- User definable output image type, name, and path
- Update of DAZ|Studio UI to indicate current pass output
- Documentation
- Informative Tool tips and help
- Instructional demo videos Using ReLight
- Assembling the rendered output in Photoshop
- Tips and tricks
User Guide
Installation
 You can find new icons for loading this product in the following DAZ|Studio content directories:
- Scripts/Utilities
The Interface
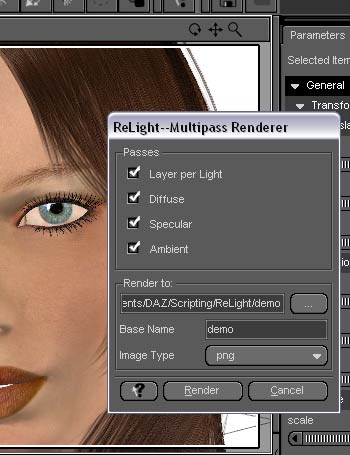
The ReLight interface can be launched by double clicking the ReLight_v01 icon. The interface provides the following options:
- "Layer Per Light"--Create images for each light in the scene.
- "Diffuse"--Create a separate render image containing only Diffuse information.
- "Specular"--Create a separate render image containing only Specular information.
- "Ambient"--Create a separate render image containing only Ambient information.
- "Render To:"--Destination path or directory for rendered images.
- "Base Name"--All rendered image names will start with this base name; pass name as a suffix.
- "Image Type"--The file type of all rendered pass images.
Check the output passes that you would like to generate as well as the destination path, base name, and file type and then render away!
In order to recombine the output images, they should be assembled in photoshop in the following way:
- All Layers should be combined in to a single PSD
- All layers should use a layer blend mode of "screen" (addative)
- Order of the layers does not matter
This product has been tested against a number of shaders but sucessful results cannot be guaranteed when using custom or 3rd party shaders. Developers should see the note below.
Instructional Videos
Tips and Tricks
- Adobe ImageReady can be used to import the render passes as frames (File>Import>Folder as Frames) and it will load all the images as layers into one image which can then be exported out as a photoshop (PSD) document. Once in PS, just set the layer type to "Screen" and start playing. Keep in mind you would not want to put multiple scenes in the same render folder as this method pulls all of the images in the folder into the ImageReady document.
- If you are changing only a single light, turn off the other lights and rerender only the lights/passes you need.
- Render with white lights near full intensity. Intensity and color can later be controlled in PS.
- Take care to render so that there is no clipping or "hot spots" in any of your layers. These artifacts will not allow you to make flexible adjustments to the layer in PS.
- In Photoshop, use a mask on light layers to create shadows or paint out unwanted light.
- Using an ambient render, it is posible to hand paint quick "Ambient Occlusion" and "Subsurface Scattering" fakes without the painful render times.
- When dealing with transparency, render with a black background and then in Photoshop you will need to remove the matting of each layer with Layer->Matting->Remove Black Matte. After all compositing is done the matte will need to be re-applied to the flattened image.
- Using Photoshop to do compositing has its limitations and challenges. It may be difficult or impossible in certain circumstances to re-assembling all layers to match a single pass render version of the same. Complex compositing topics such as un-premultiplication/premultiplication of images against their alpha channels is not covered here and further reading is recommended.
Developer Notes
This script relies on Property Names in order to properly generate render passes. Here is a list of supported Material names:
- "Diffuse Strength", "Specular Strength", "Specularity Strength", "Ambient Strength", "Reflection Strength", "Velvet Channel", "Human Skin SSS Channel".
The script assumes all lights will have an "Illumination" Property.
All other development questions can be directed to info@omnifreaker.com.
Updates
- June2009 - When outputting a Layer per Light, the light Label will be used rather than the name. This update only available in the updater for DAZStudio 3.

