UberHair
UberHair is a collection of smart presets, shader upgrades, and texture maps for the UberSurface shader provided with DAZ Studio 3 Advanced that turn good looking hair into amazing hair. The smart presets have logic built into them that make it as easy as double clicking to upgrade your existing hair presets and scenes--effectively doubling or tripling the looks you can get with your current library.
Features
UberHair will give you the following feature upgrades to the UberSurface shader:
SmartPresets
Upgrade existing hair shaders with a simple double click. Texture maps are preserved, and intelligently re-purposed to give you the most out of the UberSurface shader without having to futz with the controls all day. The smart presets do more that just keep your current texture maps--they will also do the following:
- UberHair will take advantage of the layered specular that UberSurface offers and will use the diffuse texture as a specular texture for one of the layers (Specular2 Color). The presets better simulate the complex dimensional shading you get with real hair.
- If a bump map is not being used, the generic hi-res texture (included) is applied to give you added detail and texture.
- A translucency color is used based on the diffuse color.
Shader Upgrades
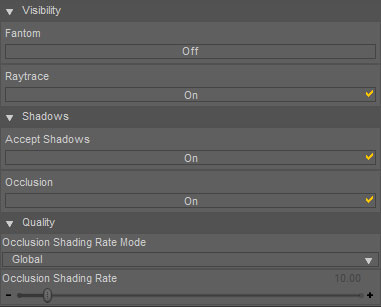
The UberSurface shader is upgraded with UberHair to give you advanced control of the important render settings.
- Visibility -> Raytrace: Make the surface invisible to traced rays (including shadows).
- Shadows -> Occlusion: Off will make the surface invisible to Ambient Occlusion (as used by UberEnvironment and others). This invaluable as you can now prevent trans-mapped hair from killing your renders!
- Occlusion Shading Rate: These advanced controls lets you use the global diffuse shading rate (specified by UberEnvironment) (Default), or allows you to override it for the surface. If you insist on raytracing your hair, a high value can be used to shave some time off of your renders.
Texture Map
- A generic bump map texture comes with UberHair to give your hair some added sweetness.
User Guide
UberHair can be used two ways. You can apply the !UberHair Base preset to simply apply the shader in its default state, or the smart Upgrade presets can be used to upgrade existing hairstyles by doing the following:
- Select the Hair object in the Scene outline or in the 3D view.
- Select all the Surfaces in the Surfaces Pane.
- Apply the preset that comes with your original hair product.
- Apply the one of the !UberHair Upgrade presets to automagically convert your ordinary hair to UberHair with the desired shininess.
Tips and Tricks
- Developers: UberHair is designed to provide realistic highlights. For best results do NOT paint your highlights into your hair texture maps.
- With hairstyles that have heavy painted in highlights, using solid colors in lieu of texture maps for specular and diffuse results can still provide great results--let the transparency and bump maps do the work in giving you color variation.

